

Alexander Grabovetskiy, woodcarver, School of Woodcarving · Published 2019
What is undercutting in wood carving?
Quick answer: Undercutting is going in beneath a leaf or a petal so it casts a thin shadow, a black line, on the background. On my walnut furniture panel the ground is only 1.6 to 5 mm deep (1/16 to 3/16 in), and I still go under a ridge that stands 0.5 mm above it.
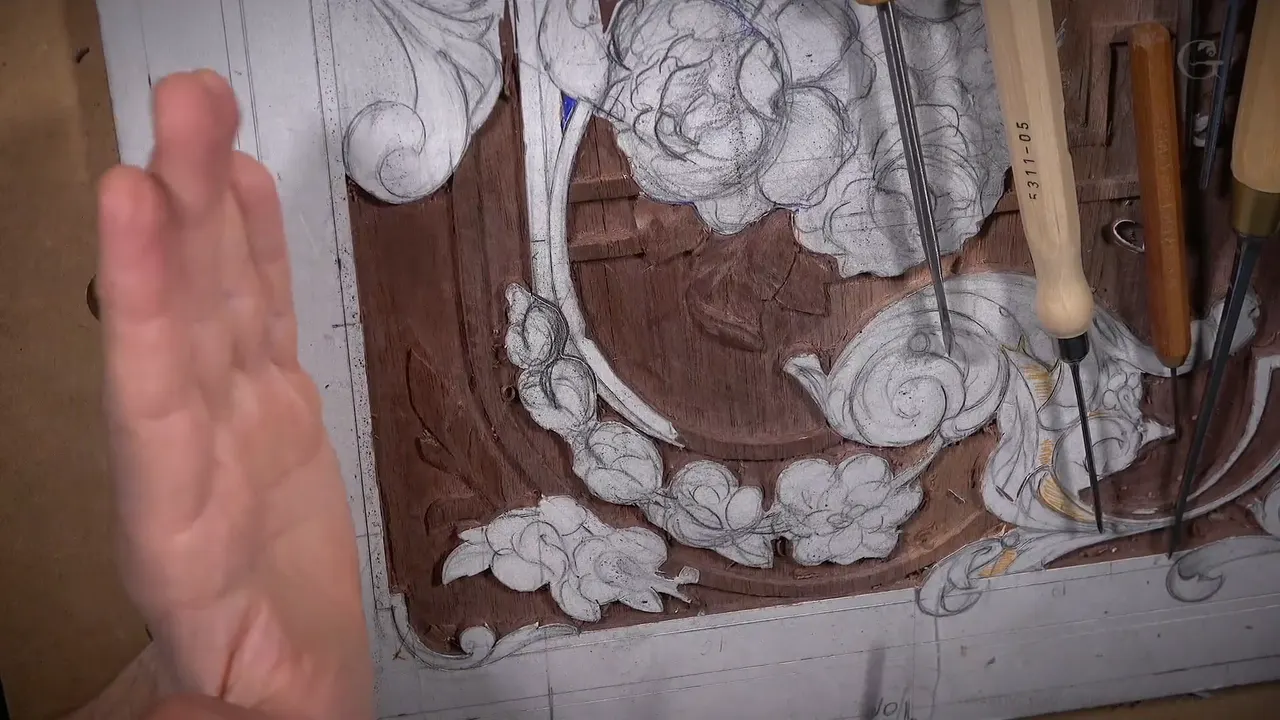
Undercutting is carving in under the edge of a leaf so the wood above it throws a shadow onto the ground. On this walnut furniture panel one ridge stands half a millimeter, about 0.02 in, above its background, and I go under it anyway. Every little bit of undercutting gives a black line. That line is what I'm after.
Ever noticed the thin dark line around each leaf on a carved panel? Seen how it makes a leaf look laid on the board? With a relief this shallow you get that line by going under the edges, and in lesson 19 of the carving stage I do it under edges that stand 1/32 inch or less above the wood around them. Along the way the moldings come down, the router plane leaves jump marks and loses them again, and a leaf spine moves to six parts out of ten.
Undercutting in wood carving, as this panel teaches it
- I undercut even where a ridge sits only 0.5 mm high, because it still gives me extra shadow.
- The tool I like best for it is a number 11 veiner of that same tiny size, laid on its side.
- Go in beneath a leaf and keep away from the background, which is very hard to fix later.
- Drop a molding about 1/32 in where an element crosses over it.
- Scrape the jump marks out, and smooth with reed instead of sandpaper.
- No sanding means every facet your gouge leaves is now design, so aim each stroke.
What does undercutting do on a panel this shallow?
An undercut puts a black line right at the foot of a leaf. Even when I went under a ridge that was hardly there, it gave me extra shadow, and as I've said many times, it's all about the shadows. On camera you barely see it.
Then I put my hand over the spot, and the shadow shows up right where I undercut. Near the end of part ten I turned off the lights on one side, then the other side, and the deep shadows came out from this side and from above. Beautiful. I was happy.

I know a lot of wood carvers don't stress about the shadows. I really like the shadow idea, and it all depends on how you cast the light. When the waste comes out from underneath a leaf, the leaf looks applied, not carved in, and that's a much richer shadow.
How small can a ridge be and still take an undercut?
Half a millimeter, on this panel. That was the height between one ridge and its background, a really small spot, and I still went under it. In another place an overlapping movement on a flower went only about 1/32nd of an inch (0.8 mm) deep, and even that much casts a lot of shadow.

Deeper is possible when the piece allows it. Under one leaf my undercut went about three millimeters, one-eighth of an inch, and I felt comfortable with that. Not all pieces behave the same, though, and some woods won't let you go that deep.
And sometimes I simply went too far. One time in part ten I saw the grain lifting at one spot, the wood getting too weak because I got too deep, so I stopped, made a small notch and took out the section that had gone weak.
Which tools go underneath?
My favorite in this type of carving is a number 11 veiner, half a mil, laid on one side and eased in carefully. Often I open the way with a one-millimeter number 11 first. With the small one I can even tap a little mallet and go deeper, but this board doesn't have much thickness to spend, so I don't take it to the extreme.

If it feels too dangerous, a gouge or even a chisel will work. For one leaf I took a number 1 micro chisel by Dockyard, 1/16 in (1.6 mm), and said I'd need the magnifier lamp. Under one leaf edge the waste came out with a sixteenth-inch grounding tool by Ashley Iles. Only its corner, at about 45 degrees.

Where there was almost no space left, a small knife or the same tiny number one still went under on a micro level. And that half-millimeter size is not the smallest you can get. A sewing machine needle already has a much smaller groove, so you can make your own tool from one. I mentioned that in another workshop.
| Tool | Job | Size | Note |
|---|---|---|---|
| Veiner, number 11 | Laid on its side, under a leaf | half millimeter | The one I like most here |
| Dockyard micro chisel | Number 1 for when it feels dangerous | 1/16 inch | Under a magnifier lamp on walnut |
| The router plane | Lowers moldings under crossings to one height | quarter inch | Set to 1/32 of an inch |
| Swiss chip knife | Scrapes out the router plane's jump marks | number nine | Thick enough to act as scraper |
| Small grounding tool | Clears waste underneath, on its corner only | one sixteenth | By Ashley Iles, held at 45 degrees |
| Dockyard number 8 | Concave around the eye of the flower | a thirty-second | The ridge left still casts shadow |
Why is the background the thing to protect?
One slip down into the ground under a leaf, and the only fix is to lower all of the background around it. Early on that is still possible. Later, once everything around it is wavy, it won't be, and it won't look good.
I lay the tool on one side and go in under the leaf, in that direction, never toward the background. You cannot be deeper than the background. When I tap the 1 mm veiner with a mallet, my left hand pushes back against it, because I don't want too much at once. Hold it steady, too. Move it upward or rock it and you can ruin your edge.

Once, cleaning around a flower and its small stem with a number three, I told you that hitting the background is not a big deal. Right before an undercut I treat it as a big mistake, because you're going to see it later and it's really hard to clean.
Why barely tap the outline first?
Every stroke leaves a mark, and if I'm planning to undercut, those marks will stay visible. So I barely hit. When the line needs more, I go around once more a little deeper instead of forcing it. Even with a 1 mm veiner I use the mallet. Mallet is always more control.

The quick way would be to hit straight down with the closest gouge and undercut from there, which is fine to do. But it leaves marks, so I go around with the veiner instead. Its cleaner line means the surface under the undercut comes out clean.
Before the first stroke on these two flowers I said it's a good idea to mark the high spots and low spots, with a marker or a pencil, and I picked mine. This petal goes under the molding. That one lifts over it. My red marker for the high spots had gone missing from the bench in part five, and I apologized for mixing up the colors.

Where should you not undercut?
On the moldings, at this stage. Holding a 3 mm veiner against a molding wall, I warned that if you turn it in and press, you're going to undercut, and then you've ruined your molding. Right now that would be a huge mistake. Unforgivable.
So the heel stays straight to the background. For the straight-down work I like a number one double bevel, because it tends to go outward from my line, while a single bevel sometimes slips inside and undercuts unless you lean it a little away.

Thin spots are the other place. I shaped one small flowing detail down with no undercut at all, and over open background I won't go through where the wood would end up too weak.
What if a leaf crosses open ground?
Send the element downhill and back up instead of piercing it. My background here is an eighth of an inch deep, about three millimeters, and that spot would be too weak if I went all the way through. Instead I run it down off its high spot until it sits about 1/32 inch, 0.8 mm, above the ground, then lift it again to meet the next high spot.
The run has to be gradual. I left a small bump in mine on the first pass, saw it, and took it out before going further. It is easier to clean, too. Then it goes all the way down, comes up, and ties the flowers to those moldings.
Why lower a molding where an element crosses it?
An element that flips over a molding has to sit above it, which means the molding has to sit below the element. On this board the crossings are everywhere, and the difference I need is about a thirty-second of an inch, under a millimeter. There's a reason I only barely touch them. I'm still going to undercut, and visually it will look much better.
Two ways get you there and both are correct. The first is a gouge. Outline shallow with the number 11, nothing deeper than 1/32 of an inch, then take a flat number 1, hold it at about 45 degrees and walk the wood down gradually toward your outline, leaving the middle of the molding untouched.

The second is the router plane, set to 1/32 in with a quarter inch blade, which shaves everything evenly and leaves the high spots alone. Mine is the second way. Some of you are picky, and I need to make sure you are not picking on me. Do not take it all in one pass if the wood fights you. Come in at 45 degrees, or split it into two or three passes. Those border lines went on back in lesson 15 with a marking gauge, a tool I don't use every day.

Why does the plane rock at the edge?
The plane rocks, and your molding pays for it. One side of my router plane has no support at this stage, so pressing down there tips the whole tool and the blade bites into a molding. In lesson 16 an island held the plane up in the middle. Here the trouble is at the edge.
Keep your pressure over the flat part, always. If the wood fights back, rotate the plane the way I did when I was clearing the background and take it in small bites. Getting close is enough.

The little blade, a sixteenth of an inch, has limits of its own. I compared it to a gym, where a muscle grows under good stress up to a degree and gets damaged past that point. Eustress is the name Wikipedia gives the good kind. So where the tiny blade would have to fight, I take some wood out first with a small veiner and spare it.
What are those marks the router plane leaves?
Jump marks. Push the plane too hard, the blade meets resistance, the whole tool vibrates, and it hops. You won't see it on camera, but the marks are there.

My repair is a scraper. Small ones are good. What I actually grab is a chip carving knife, a number 9, Swiss made and thick in the blade, and I scrape the marks flat with it. With those small knives you can scrape inside the background areas too. Go carefully. Even a scraper is still taking wood off your background.

Did old furniture makers really not sand?
Most of them scraped, if you look back on the history. I am not against sandpaper and I want to be straight with you about that, but the furniture makers reached for scrapers to level a surface. Some of them in the seventeenth and eighteenth centuries used reed, the plant that grows down by the river.
Mine is Dutch reed, and it works out roughly equal to 400 grit. I put a section of it onto a paper tube, which makes that piece last a great deal longer. I like it better than sandpaper because it doesn't leave any abrasive inside the wood. I only showed it to demonstrate the technique, not because I do it everywhere.

In part eight I picked up a wood rasp, which I had stayed away from for a long time because I thought it was not authentic. Now I'm okay with that. It leaves no abrasive in the wood either, so it won't harm your tool, and after it I can always touch the surface with a gouge.
Edges that come out too sharp get the reed brush. That's how they did it. The other way is a knife and a micro bevel, which works fine but takes really big accuracy on a leaf this size.

Where does the spine of a leaf belong?
Six parts out of ten across the leaf, not right in the middle. I take the width, divide it in my head into ten, and put the middle line at six, which is my golden ratio even on small details. No measuring. Once your eye is trained, it's not a problem. In design lesson 12 I checked that point with a golden ratio tool. On a leaf this small I eyeball it.
The neighboring leaf gets its spine shifted the same way, so the two lines run parallel to the eye. Law of repetition. I broke that rule myself in this lesson. After a concave on both sides of a stem I saw the movement right beside it, which it had to repeat, so I cleaned it and moved my spine slightly. Now it repeats.

Two parts earlier, three leaf movements came out almost the same size as each other. No bueno. Repetition also needs rhythm, so a detail repeats but not at the same size, and I destroyed what I had just done to break them apart. They still looked a little too equal, so I blended them out and went back in with micro tools. This panel is not for a client and there's no deadline, so I don't have to rush it.
Why do the last strokes run toward the center?
Every facet my gouge leaves becomes part of the design here, since we are not sanding it. Logically the middle point is where everything grows from, so the rest of the strokes on that flower go toward the center. On raw walnut you can barely see it. Put shellac or lacquer or wax on the same panel and every single stroke shows up.

Later, on another leaf, I said it again. Everything grows from the center out, and every stroke will count. On the veins of a leaf in part six, all my strokes went from inside out instead.
How do you round an edge with almost no room?
Chamfer by chamfer. With the heel of a small knife, and later a number one of 1.5 mm, I take one chamfer, then another a little above it, and I rotate as I go until I reach my fillet, which means rounding the corners and the edges. It is like jewelry work. I control it with my fingers.

One curl on this flower is only one-eighth of an inch, three millimeters, across. For its micro volute I held the number one in my fingers alone and shaved. I pushed too hard once and almost lost a part. Go easy. Your tools must be really sharp for this. With dull ones it all goes smooshy and you get really frustrated.
Spend as much time as you need in those tiny areas. They make a huge difference.
Can you start with the prettiest flower?
You can, but it's going to be a little harder to get consistency later. When you design something, you want to see the most beautiful part right away, that big cluster, and I've done that too, many times. But then the waviness is already there, and the router plane can't travel anymore without rocking. That's why I ran the router plane over as much as I could first.

And still, in part eleven I admitted I couldn't resist and did three elements right in the middle first. It's not the best idea to start from the middle section.
What keeps a thin carved panel from moving?
Thicker parts, left on purpose. The more material you remove, the less support the panel has. In other generations, I explained with a sketch, some furniture makers cut a dovetail channel across the back and slid in a second piece with its grain running the other way, maybe 3/32 inch (about 2.4 mm) thick, then planed it level. The crossing grain stops too much movement.
If the panel sits inside rails and stiles, the frame does that job and you don't have to. The panel has mainly three depths, 5 mm, 3 mm and 1.6 mm (3/16, 1/8 and 1/16 inch), and lesson 17 works on that multi-level ground too. I promised a depth map for when the background is final. Look for it beside the pattern download.
The crossings themselves were drawn in the design course. In design lesson 9, for one, I drew a volute curling behind a molding, and design lesson 14 holds the finished drawing. After lesson 18 and this one comes lesson 20, the flowers in the upper right corner, and the panel carries on in Part 3. The course about carving tools goes through the tools named here one by one.
All sixteen parts of this lesson are waiting in the school.
How it's done
- Lower the moldings where leaves cross them. Set the router plane a thirty-second of an inch down with a quarter inch blade and shave evenly. Leave the high spots untouched.
- Outline with light taps. Go around the shape with a 1 mm number 11 and a mallet, barely hitting. Deep strokes leave marks that an undercut would show.
- Go under the edge with the small veiner. Lay a half millimeter number 11 on its side and work in under the leaf, never down into the background. Hold the tool steady and keep your other hand pushing back.
- Hook the waste out. Turn a number 3 upside down and lift the loose chips out from underneath.
- Check it with your hand. Hold a hand over the spot or switch off the lights on one side. The black line along it shows whether the undercut is there.
Frequently asked questions
Did every furniture maker undercut a carved panel?
Furniture makers did not all undercut on a furniture style carving, as I say while working on this panel. I do. I like that extra shadow casting, and I really love the effect, even on a ridge that is very thin.
When in the job do you undercut?
Usually not right away. On one flower in part twelve I said it was really too early. Part five is different. There I did one early on purpose so you could see how it looks in case you jump ahead of me, and there is nothing wrong with that.
Will a small knife undercut in a spot too tight for a veiner?
A knife does the job there. I lean a small knife a little toward the inside and press almost nothing at all. Pushing harder would be a big mistake, so I go back and make a second attempt instead, and the separation came out really nice.
What to carve next