

Alexander Grabovetskiy, woodcarver, School of Woodcarving · Published 2022
Why is a carved leaf divided into three?
Quick answer: Splitting a carved leaf in three is giving it anatomy, a center line with a main division to its left and right. In Maine class 4 I drew it that way on my iPad, then split every one of the three in three again. Once it is drawn, a relieving cut opens each separation before any shaping.
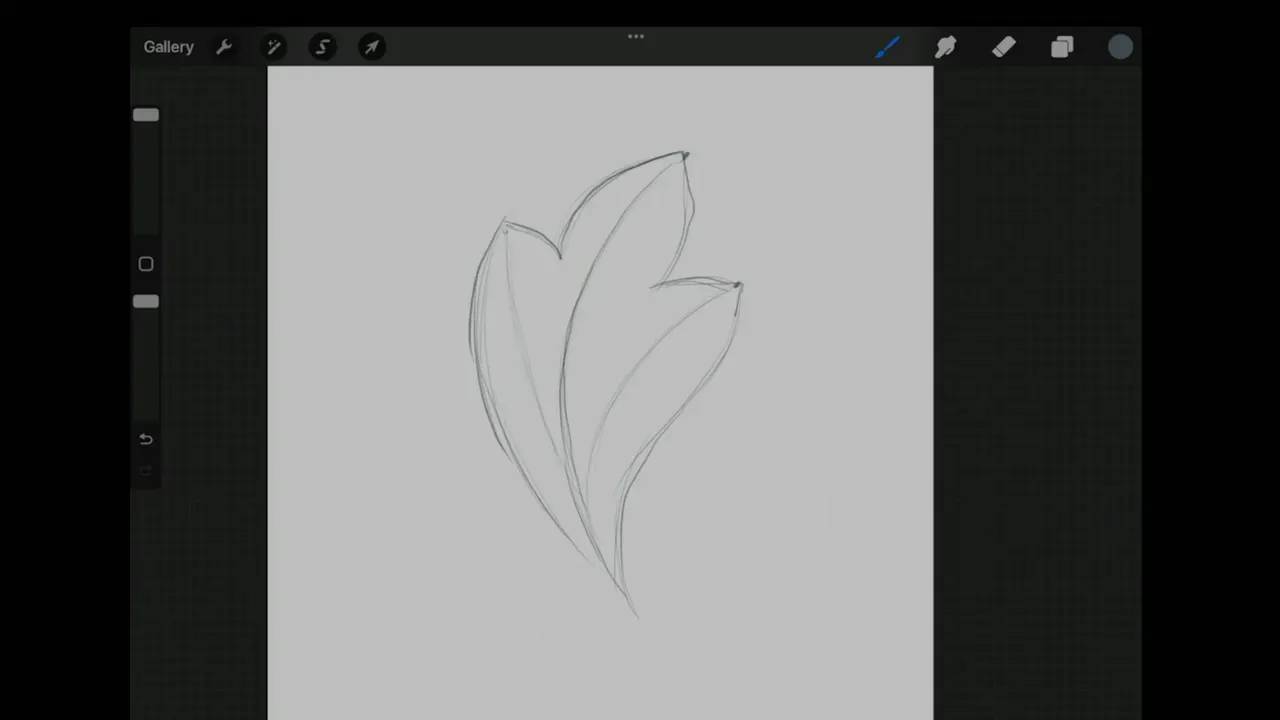
A leaf carved on three lines is a leaf drawn with a center line and one main division on each side of it. I drew that anatomy on my iPad in class 4 of my Grinling Gibbons course, the one we recorded live with students in Maine. Then each of the three got three more.
Have you looked at a carved leaf and wondered where its lines come from? Would it help to see them drawn out, one at a time? There are three. In class I drew them in pen right on the wood before the small gouge went in.
By the end of this page you can draw those lines on a leaf of your own, and you will know which tool opens them.
Three lines, then three more inside each
- The middle line plus one more to its left and right make the three main lines.
- Each part gets three more inside it, and you can go further if you like.
- I put the middle line at about 60/40.
- A relieving cut goes straight down first, then a small number 11 works the tight separations.
- Two concaves beside the middle line make it stand up as a convex.
- Every leaf in the group is the same idea, pointing its own way.
What are the main lines in leaf carving?
A center line, with one line beside it on the left and one on the right. Partway through the class I drew it on the iPad, to explain the logic of those leaves, their anatomy, one more time.
You've got a point, another point and another one, and from those points you make a movement like that. All of them are about the same. That's the main idea.
Before that I had drawn the same lines in pen on the roughed leaf itself. See those three lines? Those are the main subdivisions, and inside them I subdivided more. A pen helps, actually. You see better.

Why divide a leaf into three at all?
Anatomy, mostly. On this panel I told the room these leaves were supposed to look somewhat like acanthus, but they are not. A parsley leaf sometimes looks almost like an acanthus leaf, and I was not going to take it all the way there.

I gave a plainer answer in another course. Designing a furniture panel, I subdivided even the small leaves there, and said that if you ask me why, I still want them in the same idea as the acanthus. It's not acanthus, but still, it kind of ties it all together. It comes from lesson 14 of the furniture panel design course.
Real leaves give the idea some ground. Wikipedia's page on the leaf calls the central vein of many leaves the midrib, with secondary veins branching off it toward the edges.
I said the same on the Byzantine acanthus. Divide that in three, and each of those we divide in three. You take a spot and work out where, logically, the separation should go, approximately. I could have drawn it all at the start and you could scroll it out, but then you would miss the point, how to carve it as if it were one solid piece of wood.

Where does the middle line of the leaf go?
Close to 60/40, the golden ratio, which I put at 62 and 38 percent. The leaf begins somewhere underneath the flower. Take that point and the other two, put the line through, and it falls about 60/40. That was my division.
It doesn't have to be that. Gibbons did not worry much about it, and I put it there on purpose anyway. I wanted you to remember the rule, even at the level of leaves, and if you want to be better than him, you can do it.

Later in the class it came up again on a filler flower. I took its center, then two points, and they came to the golden ratio spot, 60/40, or 62/38. You don't have to be crazy about it. It just comes natural to me, and I kind of like it.
How do you split each third again?
In three, exactly the same idea. So inside every third goes another set of three, and each one of those can take a further set after it if you want to be crazy about the thing.
For more of a parsley look I did one more thing. I got rid of the boundary line between two parts on the right, and did exactly the same on the left.

On a long acanthus in Venice Room workshop 74 I counted it out loud. Three main divisions, and inside those three, we also divide by three, one, two, three. That gave me a long movement acanthus.
One parsley leaf on this panel gets its own class. Class 14 shows where the eyes of a parsley leaf sit, near the stem, and how that keeps it from turning into acanthus.
What opens the separations first?
A relieving cut, with a number 9 at 10 mm (3/8 in). A vertical stop, straight down at ninety degrees, made before you try to shape anything beside it.
Where the subdivisions meet, the wood leaves little corners. I call them triangles because that is what they are. Don't go at them with the wrong tools, and in all of those areas where you have a separation, make the relieving cut first.

Small areas need small tools. There I took a number 11 at 3 mm (1/8 in) and just worked my way into those separations. Don't worry about perfect detail yet, you'll get to it a little later. The main idea has to be there.
Early in the class I asked if anyone had noticed we had used only three tools on the project so far. Three tools, and we were already there. That small eleven became tool number four.

Its flute is the center part of the tool, the hollow. Lean the flute over to about eleven o'clock as it goes in. I went in right underneath that way. And don't forget, you do have the number 11. You can always outline with that little zipper if you need to. I was doing exactly that, a little deeper.
What has to be decided before any detail on the leaf?
Which part goes over which. They share one anatomy and none of them faces the same direction. So I had to make the decision, what is going to overlap what. One part looked like it would go over the other, so I made a preliminary cut on that line with the same tool. The undercut comes later.

Step number one came even before that. I wanted one movement deeper, with the gouge going somewhat under it, like a shadow line. Short strokes, and I was still slicing. It was not a full undercut yet, and the tool was the same 10 mm nine.
And don't try to be as fast as me. Some of you jump right in and start carving. Wait. Hold your horses.

Why does the middle of the leaf stand up?
To show the movement of the center line. I really like to see that center line as a convex, bulging up, and to make a convex I have to make two concaves.
Run a concave down one flank with the nine, run a second down the other, and the ridge standing between them is your crown. The side of that same tool blends it, so it looks like a true bulge. I would also love to see those edges raised up, slightly.

Right after, I cleaned it with a number 2, used upside down and presented at 45 degrees to the work. If upside down doesn't work, present it the normal way. See how I'm slicing? I cleaned those ridges and still kept my bulge right in the middle. The rest takes just cleaning up with a straighter tool.

Later, on the iPad, I made it plainer for the room. I put a white spot where it stays raised, then darkened the concaves, a main one, a second, and another on the other side. Not big, but still concaves. Then the spray paint went on a new layer for the darker color, and on another layer I marked the edges, which are going to be somewhat raised too.

That raised middle was the choice for these leaves in class 4. For the parsley leaf of class 14 I took the middle the other way, a light V, and that page shows how parsley differs.
How do you tell an original acanthus carving from a fake?
Check the raised spots and the low spots. In 18th century furniture there is a lot of acanthus carving, and a lot of people don't understand the logic behind its anatomy, which is the same as on these leaves. The middle part is always raised.
It also depends on the style. But if you see a concave inside, it's no good. People just don't know what they're doing. That's how they tell Chippendale's original acanthus from a fake. They check those raised and low spots.
Thomas Chippendale, Wikipedia says, was an English woodworker in London. In 1754 he published a book of his furniture designs, The Gentleman and Cabinet Maker's Director.
How deep do these leaves go?
A quarter of an inch, 6 mm, at the lowest places, with the edges taken right down to meet that. In some areas I was trying to get as low as possible, down to 1/4 inch toward the background. I know you probably don't see that well.

Don't overdo it at this stage, and you don't have to overcomplicate the stuff. Some details get added later on.
There are two schools, two approaches to carving. In one you work your details first, area by area, and clean each one up completely. Later you want to change the design, and you wasted so much time. It's going to get to you. It's really frustrating.
I like the second approach. I create the main form and then work the details, and if I need to change something, I did not waste too much time.
Which gouges did class 4 use on the leaves?
Every leaf tool I named in this relief is below, in the order each gouge came out. Sizes are as I gave them in class.
| What I did | The gouge I picked up, with its size | What I said there |
|---|---|---|
| Relieving cuts first | number 9, 10 mm (3/8 in), straight down | like 90 degrees down |
| Small separations next | small eleven, 3 mm (1/8 in), flute leaned | to about 11 o'clock |
| Two concave cuts | the same number 9, one down each side | then blend with side |
| Cleaning the ridges | a number 2, upside down, at 45 degrees | or the normal way |
| Outside boundary line | a number 7, turned upside down for that | how nice it is |
| Outlining again, deeper | the 3 mm eleven, my little zipper again | if you need to |
Do not make them symmetrical either. They don't need to be perfect, and as a matter of fact, it's better to make them not symmetrical.
What came after the leaves in class 4?
Filler flowers, the small ones that fill the space. Why Gibbons used them all over his panel, and how big we drew them, is class 2. Here we carved them.
Remember, you've got to have five petals, Fibonacci. For those who don't know Fibonacci, you don't need to know. And they are not supposed to sit on the same level, so one hides below another.
I gave my reason for five in the Hashemi flowers course. You can subdivide into as many parts as you wish. I like to be really close to nature, and as far as I know, the number of petals comes close to a Fibonacci number. I said there I'm not saying that's the absolute truth.

Approach number one was to outline a flower with the 3 mm veiner, attacking from different points. Stay shallow. A couple of millimeters, a little more than 1/16 inch, 1.5 to 2 mm is okay. Stop short of 3 mm. An eighth of an inch will be too much.
A student asked why I use a veiner and not a V-tool. Excellent question. A V-tool is an excellent tool, but it was not invented for that purpose. You don't need that sharp line, it will be hard to clean, and a veiner gives you a nice line. I can also use just the side of it, and then it works like a number 3.

The second flower goes right underneath, so I took a number 7 at 14 mm (about 9/16 in) to blend it in. After that I dropped the whole area down to 1/4 inch (6 mm) with the nine.
Please, don't separate those flowers. If each flower is separated, they're not going to look nice. One goes underneath another, and some will be hidden. Class 3 is built on it.

Around the flowers I started undercutting with the small eleven, flute at 11 o'clock, careful not to break it. I am after a really nice shadow. If you have a number 11 at 1 mm (0.04 in), and you should, you can push that shadow even more. But don't overdo it, or you will ruin the petals.
Another student asked if the flowers could be bigger or smaller. It's up to you, but they are the same flowers, so not as much variation. To exaggerate depth, the ones closer to the background get smaller and the ones near the top get bigger. Here we don't have too many, so it doesn't really matter.
I still didn't want them the same. One was 3/4 inch (about 19 mm), one about 1 inch (25 mm), no more, and the smallest about 1/2 inch (12 to 14 mm).
On the outside, a petal can have a simple round look, like Gibbons did, or some waviness. Waviness looks more natural, more organic. The nine went straight down, and the 14 mm seven blended the petal. Which way petals overlap is class 8.
Gibbons kept his flowers really simple, with pretty much no movement inside. That's why he called them filler flowers, I told the class, because you fill the space. I'm not saying that I'm better. But if I'm filling something, I really want to look at it and enjoy it, so I put a concave right inside the center using the small eleven and blended it a little, for an extra shadow.
Class 4 is one of eighteen in the Grinling Gibbons course. The first eight were recorded live, so you hear the room, questions and all. After this one, class 5 undercuts a stem until light shows behind it, and my Greek acanthus and Roman acanthus courses are built on the leaf these ones borrow from.
Every class of the course is open with tuition, the carving and the talk both.
How it's done
- Draw the center line. Put it near 60/40 from where the leaf starts underneath the flower. A pen on the wood helps you see it.
- Add the two main divisions. One line on each side gives you three points. From those points, draw the movement of the leaf.
- Divide each part again. Split every one of them in three. For a parsley look, remove the boundary line between two parts.
- Make the relieving cuts. Go straight down at 90 degrees with the 10 mm nine. In the small triangles, the small number 11 takes over, its flute leaned to about 11 o'clock.
- Raise the center line. Run a concave down each side with the same nine, then blend with the tool's side until the middle bulges.
- Clean the ridges. Slice using a number 2 turned over and tipped to 45 degrees, or the normal way if upside down won't go. Keep the bulge in the middle.
Frequently asked questions
How many main lines does a carved leaf get?
Three, the middle one plus a line to either side, the way I drew it for the class. Inside each one go three more. Keep going only if you'd like to be really crazy about it, as I put it in class.
Where should the center line of a leaf fall?
Around 60/40, about where the golden ratio puts it, measured from where the leaf starts under the flower. I did that on purpose so the class would remember the rule. Gibbons did not worry about it much, and yours need not be exact either.
Why use a veiner instead of a V-tool for outlining?
A V-tool is an excellent tool, but in my words it was not invented for that job. Its sharp line is hard to clean, while a veiner leaves a nice one. Turned on its side, a veiner even works like a number 3.
What to carve next