
Alexander Grabovetskiy, woodcarver, School of Woodcarving · Published 2023
How does furniture carving differ from openwork carving?
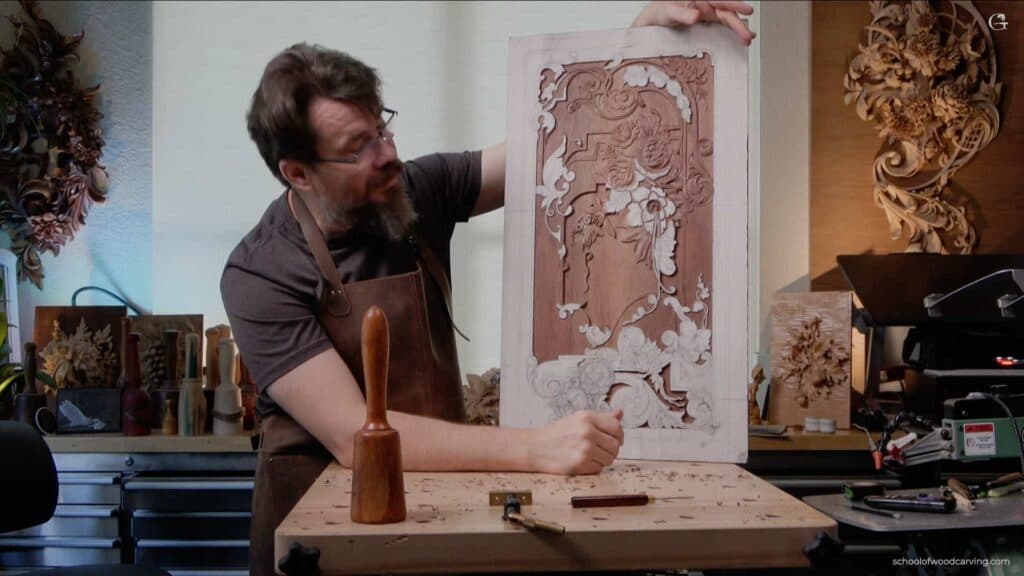
Quick answer: Carving for furniture is relief work that has to stay practical, because people will bump into it. Openwork makes holes right through the material. On my walnut panel I could have carved right underneath one spot so you would see right through, but I kept the tendrils close to the background.
Furniture carving is relief work that has to stay practical, because people are going to hit it. So on this panel I don't make much of it airborne. Openwork goes the other way. Wikipedia describes openwork as any decorative technique that makes holes, piercings or gaps through a solid material, and wood is on its list.
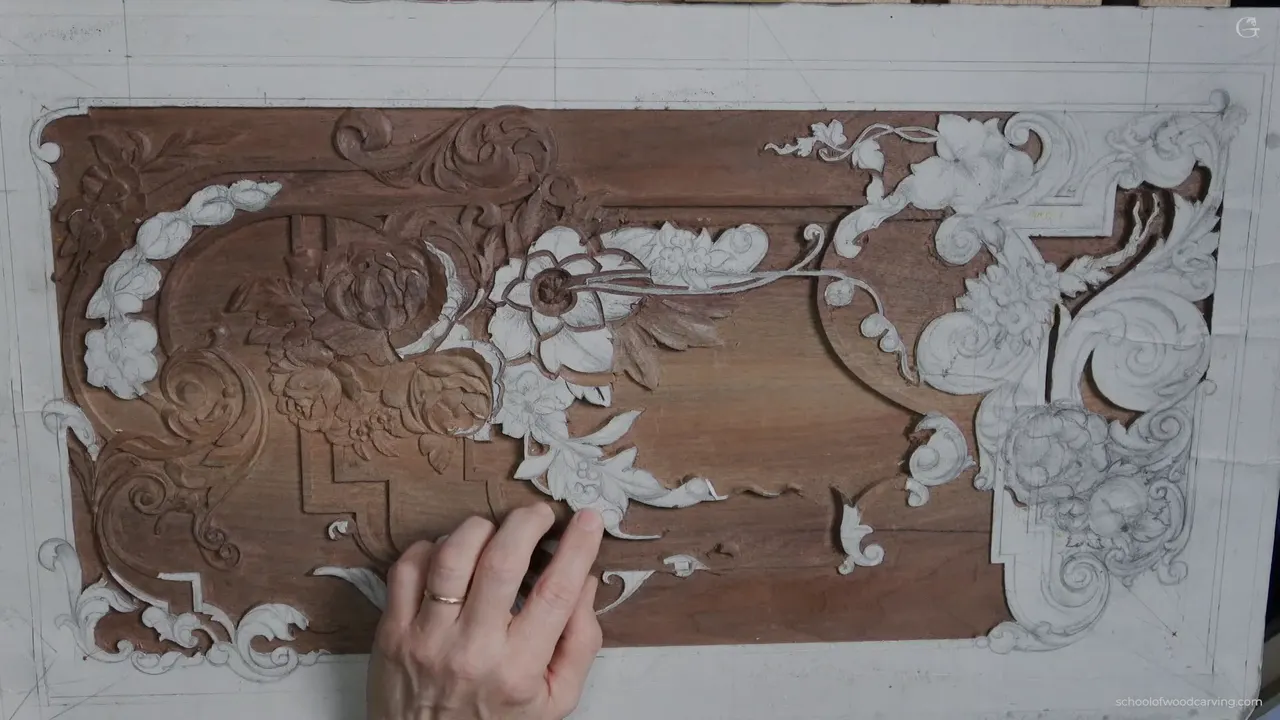
This is lesson 31, in three parts, on the same board from Designing Furniture Panel 1, a walnut panel only 10 mm (3/8 in) thick. It comes right after the volute in lesson 30. I was kind of tired of the side I had been working on, so I jumped to the other side. There I had a couple of spots to dig down, and a small detail, the tendrils, which would sit really close to the background.

Have you ever bumped a table with your hip? Brushed a chair with your bag? Then you already know the answer to this page. So I keep the carving down near the background and get the depth some other way. By the end you will know how this section got its shadow without carving under the tendrils.
The whole section in six lines
- A see-through movement is not practical on a furniture panel.
- To put one part under another, I dropped it to about one millimeter, maybe one and a half.
- Slopes tilted in opposite directions give a shadow on one side and less on the other.
- No tendril is wider than 1.5 millimeters.
- The berries come from the corner of an upside-down number 7, tipped over to 45 degrees or so.
- Boring means not enough movement.
What is the difference between furniture carving and openwork?
The difference is how much of the carving you let hang in the air. In the first video I had a small overlap on this side, and there, I said, I could create some kind of airborne movement. I could carve right underneath it, and you would see right through. But it would not be practical.
That is the huge difference between carving for furniture and ornamental carving. You don't make too much airborne stuff on furniture, because people will hit it. So it is not a good idea. My panel keeps the tendrils down near the ground instead.
Lesson 22 on this same panel deals with a cousin of this worry, ridges left too sharp on a piece that gets used. Here the worry is a part that sticks out into the air with nothing under it.

Could one airborne spot have held up?
Maybe. In part two I came close. I said I could do airborne at one spot, but I was afraid it would be too fragile. The grain direction runs that way there, so it is a kind of solid area, and it should not be a problem. Still kind of risky. I left it alone and went back to refining.
The grape onlay is the opposite case, and I said so in Carving Grape Onlay 5. One spot there was strong enough, but weak too, because it twisted slightly to the left and the grain would be too short. So you have to be careful. But I liked it. Obviously that one is not for furniture, because it has a lot of airborne stuff, floating, scrolled all the way. I went through from both sides.
Near the end of that same part I came to another spot with short grain. It cannot be airborne, I said. It could be, but there is no reason.

The Venice Room course has a case where even ornament stayed solid. In workshop 76 I could have taken one spot right through. Yes, I could. But it would look unnatural in the overall movement, and you would still detect that something is just wrong. If the whole thing were pierced work, that would be okay. I didn't do it.
Two more pieces sit on either side of this question. My Roman acanthus panel is decorative, a piece I could frame and hang on a wall, so it did not have to be practical like furniture, and Carving Roman Acanthus 10 tells what that allowed. On the chamomile rosette I said probably not to airborne, because of how that piece will be used and installed, in Chamomile and Bow Rosette 2.
How low do the parts sit on a 10 mm panel?
Low. The board is only 10 mm, and from the start the tendrils were planned to sit near the background. Early on I felt one part needed to be lower than the two beside it, so I pulled it down as much as possible, to about 1 or maybe 1.5 mm off the ground.
Another part went to about a sixteenth of an inch above the background. During part three, a number 3 spoon took two more quite a bit lower, down to about 1/16 inch from the background. Same idea everywhere, pretty much.

And the width. I want to see no more than a millimeter and a half wide movement everywhere, or 1/16 of an inch. That goes for all of the tendrils I have, everywhere on the panel. Part three gave the stem the same limit.
Depth and final detail could wait. In that first video I said I don't worry about them yet. What I do worry about is breaking one of those tendrils, since they are tiny.

Where does all the waste go?
Into plug cuts first. I started on the couple of spots that had to go down, with a number 9 and the mallet, making one plug cut after another. It is just one of the approaches, by the way, and I kind of like it. At another spot I showed a second way, taking the wood out from the side. The plug cut itself is explained in lesson 26.
I don't want to overdo it, though. My background has to be at the same level, and at this stage it is better to be a little higher than to go all the way. The triangles came out next, using a number 11 at 2 mm and the mallet.
Before the second side I turned the panel around. I think it was wiser to attack from the opposite side. There the number 9 was a quarter inch (6 mm), then a smaller one, 1/8 in (3 mm), and one more plug right in the center made the rest of the material much easier to remove. At the very end of part one a narrow veiner cleaned slightly right inside, and there was my triangle.

Which part goes over, and which goes under?
I settled that on camera, one spot at a time. At one overlap in part one I said, I'm not sure, should I overlap above or below? That meant I had to lower this side of the leaf slightly, to about one millimeter. I outlined the flipping motion too, and the separation between those two.
To lower it I took a flatter tool, a number 5, a quarter inch, about 6 mm. Rough is fine here. I don't worry about how rough or how thick the movement is, because I can always refine it. I want to make sure I understand the overall movement.

The next overlap got its direction in the second video. I took whatever was on my bench, a number 5 that time, chopped the whole thing, and went about 1/16 inch deep. One part of a leaf was supposed to go somewhat below the tendril, maybe even below it. Don't press too hard there. Otherwise you will destroy your tendril, that movement.
Later a little leaf was going to lie on top of the left-hand side. Then a number 11 lowered things around it, somewhat extreme, because I really wanted to see some movement.

How do slopes make a shadow without a hole?
By tipping two surfaces against each other. In part two I lowered one side on a slope, this side lower than that side. Where those meet, you see some kind of micro pipes, if you wish. I kept one section somewhat higher and took the other down to about one and a half millimeters.

I wanted to see a ridge there, because it gives me the idea of the center line, and those become like pipes. A little more sweep could exaggerate that movement, I said, like maybe a number 7 or even a number 8, to get some shadow, because right then it just blended and I didn't see a huge movement. I really need to see that movement.

With the number 8 I made some indications of the veins on the right-hand side, and one side could go slightly deeper there. I'm not sure you can detect that, but there is a ridge, and that is what I'm after.

The next one sloped the opposite direction with the number 5. In the overall movement that makes a beautiful spot, a shadow on this side and less shadow on that side, and the whole thing feels more unified. Later I held one side down even more and got a much deeper shadow.

Another leaf in part three got its center line at about 60/40, about the golden spot. Then a number 8 made one more pass on this side. I'm pretty sure you can see that center line.
Later on I will undercut some of this for an even deeper shadow, with a half-millimeter number 11. It was a little too early for that in lesson 31. The whole story of undercutting on this panel fills lesson 19.
How did I carve three tiny berries?
On the corner of a gouge. Three little ones sat in the middle of the group, and I outlined them first, using a number 11. Two and a half millimeters, or 2 mm will do, or even 3 mm. A white spot of paper I left there becomes a stem, and the section beside it gets dug much deeper. They are really small berries, but they will look really nice.
For the shape I used a number 7. It shows 6 mm, but it is more like 5 mm, which is not a big deal. Any of those five or six millimeter ones will work. I use it pretty much upside down, so the flute goes downhill.

Now the really important part. I start with the corner of the tool, I am not pushing with the whole body, and I present the tool at about 45 degrees, not 90. What I'm after is the triangle between them. It works the same on a grape carving. We did a grape project at a school that year with the same idea.

You can always go deeper later. If you are able to control the direction of the grain, that would be nice. Not always possible. Little by little I made the shape of those berries. No cleanup yet. The overall shape comes first.
They don't need to match, so I let the three come out slightly different in size. Then I chopped this side down to the background, so you can see how deep they are. The stem goes lower than those three. The flatter number 5 placed it right below them, and then I got rid of the paper.

What did I do with a leaf that looked boring?
Gave it more movement. Part three began with the stem, though. I wanted a really thin movement going right underneath that bunch. A number 8 on both sides gave the stem a nice transition into the leaves, then a flatter gouge, maybe a number 3, took it lower, and that gives me some depth. I think it looks really good, and that is obviously my opinion.

Then one part bothered me, with the stem sitting somewhat above it, and there are a couple more ways to attack an area like that. You can make a concave inside and have the stem come from underneath. Maybe I should do that, I said.
It looked just a little too boring for me, so first I dug out a concave there. When I say boring, I mean not enough movement. I looked at that leaf, and it didn't look organic enough for me.

So I made a big separation, then another one, and opened it up somewhat, maybe even with a half-millimeter pass to make a deeper shadow. More separations followed, one here, one there, and one for later. Oh, I'm sorry, I said on camera, you probably didn't even see what I had done.

A flatter tool rolled the part right underneath. A little more movement, and I liked that much better. I chopped straight down with a number 7 after that, closer and closer to the stem line, and I thought it would look lighter, nicer, and a 3 mm number 3 then refined the stem.
Why take a leaf off before its turn?
One leaf was just in my way. A flower goes right underneath it, so I took care of it right away and got rid of that big chunk. Otherwise it would just bug me, right in my face. The cleaning can wait. I will clean it a little later.

Then I outlined that flower, because three little ones sit below it, and everything around it there is waste. Next a number 9 plug cut at 3 mm took the area a little deeper. Later, with the little ones taken down, I had freed some room for the flower, which is actually a really nice flower.
Then those two small ones got the number 9 at 1/8 inch again. Don't take too much in one pass there. It is a somewhat fragile area, so little by little. I tried a smaller number 9, about a millimeter, but it was maybe too small, and the 1/8 inch one came back.

Each spot, the work and the tool
| Spot in this section | What I did there, in a few words | Tool |
|---|---|---|
| Waste beside the tendrils | Plug cuts, stopping short of the background | Number 9 at 1/4 in, then 1/8 in |
| Triangles between shapes | Taken out, with help from the mallet again | Narrow number 11, 2 mm |
| One side of a leaf | Lowered to about 1 mm for the overlap | Quarter-inch number 5, about 6 mm |
| Leaf veins | Small marks on the right-hand side, for some shadow | Number 8 gouge |
| Three tiny berries | Shaped on the corner, tipped to roughly 45 degrees | Upside-down number 7 |
| The boring leaf | A concave, separations, then rolled underneath | Flatter gouge, later a number 7 |
| The stem | Refined to the same width as the tendrils | A 3 mm number 3 |
That is what we worked on in lesson 31. Not much is left on this panel now. I already know how I'm going to use it, but that's a surprise. Stick with me and the school, and you will see how it ends. Next time maybe the flower, I said, and lesson 32 is where the panel goes next.
All three parts of this lesson are in Carving Furniture Panel, Part 3. If you want to carve this kind of shallow work with me, the Tuition and Access page has the details.
How it's done
- Keep the tendrils down. On a furniture piece, leave the tendrils low instead of carving under them, because airborne parts on furniture are not practical.
- Clear waste with plug cuts. Use a number 9 and the mallet. Stay a little higher than the background for now, since that is better at this stage than going to full depth.
- Set each overlap. Drop whatever goes under until it stands only a millimeter or a millimeter and a half high, using a flatter tool such as a quarter-inch number 5.
- Slope for shadow. Tip neighboring surfaces in opposite directions so one side holds more shadow. Where a movement just blends in, try a number 7 or 8.
- Shape the berries on the corner. Turn a number 7 upside down and lead with its corner, tipped well over, with no pushing from the whole body.
- Refine later. Rough edges and thick movements can be refined afterward, so get the overall movement right first and clean after that.
Frequently asked questions
Can furniture carving have parts you can see through?
Not much. One spot on my walnut panel could have gone airborne, since the grain ran that way through it, but I still called it risky. People are going to hit a furniture carving, so a see-through tendril is just not practical.
How wide should a carved tendril be on a furniture panel?
On my panel, no more than 1.5 mm, a sixteenth of an inch, and that applied to every tendril I had. Even the stem near the berries got the same limit. Keep your pressure light around them, or you will destroy the movement you were after.
Which shape should go underneath, and how deep?
I was not sure at one spot either, so I lowered one side of the leaf to about 1 mm first. One part then needed to sit lower than its two neighbors, so I pulled it down until it was about 1 to 1.5 millimeters above the background.
What to carve next